Do you want to start a blog that attracts readers organically and generates passive income? If so, consider reading this post to find out how.
Here are the steps you need to take to start a successful blog in under 15 minutes:
⌚Are You Short on Time? Click Here to Start a Blog for FREE Right Away!
This Free Guide Has Helped More Than 9,000 People Start Their Own Money-Making Blogs. Follow the Steps in This Guide to Start Blogging Today.
Don’t hesitate to contact me if you get stuck on any step in this guide, and I will assist you for Free!😉
🚀 Want to skip all these steps and get started right away? Click Here to Start a Blog for FREE!
Step 1: Pick a Topic to Write About
The first step in starting a blog is picking a topic. It could be about a hobby or something you like doing. Make sure you choose a topic you’re interested in and know a lot about. That way, you won’t get bored or unmotivated quickly.
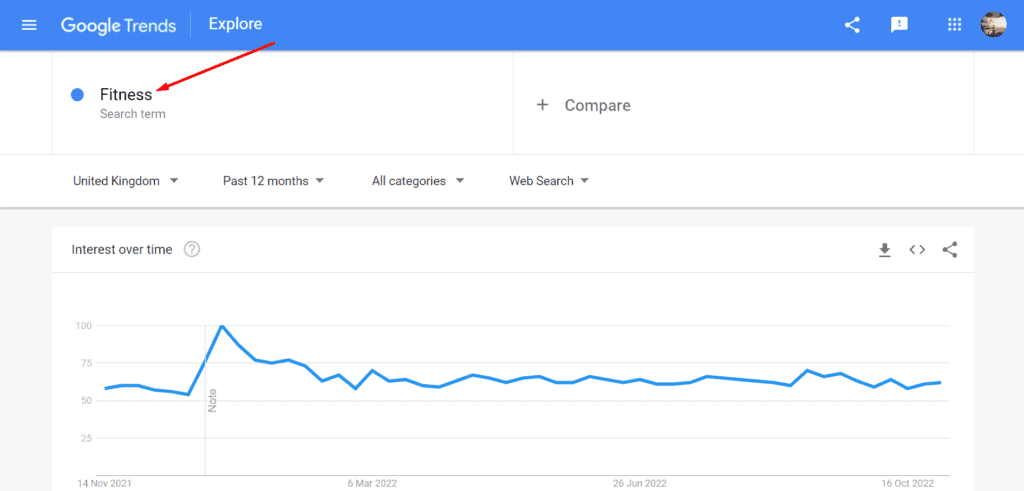
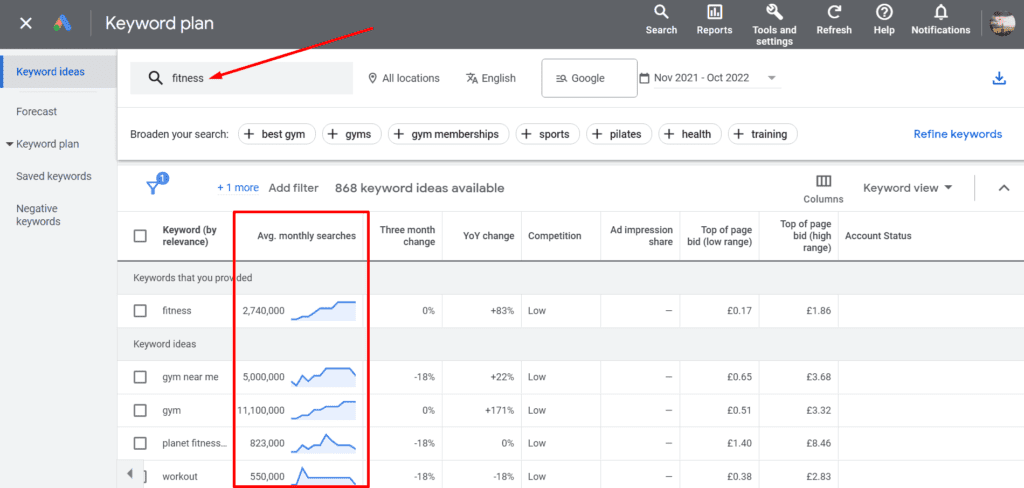
Also, check a topic’s popularity and monthly search volume before blogging about it using free tools like Google Trends and Google Keyword Planner.
Having Trouble Deciding What to Blog About? Don’t worry, carry on with the blog-building process and research a topic after you have completed your blog setup.
Step 2. Choose a Blogging Platform
A blogging platform is a service that allows users to create, publish, and manage their blogs. Starting a blog can be tedious, especially if you don’t have a technical background. However, with the WordPress blogging platform, anyone can create a blog without writing a single line of code.
WordPress is the most flexible and easy-to-use blogging platform on the internet. Besides that, WordPress makes building a blog easier and faster.
Here are some reasons why you should set up your blog on the WordPress blogging platform:
- It is easy to use: Building a website with WordPress is very easy, you can easily drag and drop elements to create a website.
- WordPress offers a wide variety of themes and plugins: Unlike other blogging platforms, WordPress offers a wide selection of themes and plugins for building websites.
- It’s free to use WordPress: With the exception of the domain and hosting fee, building a WordPress website is free.
- It’s the most popular and widely used blogging platform: WordPress powers 43.4% of all websites on the internet, making it a great platform for blogging.
Step 3: Choose a Domain Name for Your Blog
A domain name is your blog’s address on the internet (For Example, petblog.com, fashionblog.co.uk, or newsblog.in). Choosing the right domain name can help your blog rank higher in search engine results and help readers understand what the blog is about.

Here are a few things to keep in mind when choosing a domain name for your blog:
- Keep your domain name short and simple: A short and easy-to-pronounce domain name makes it easier for visitors to remember your blog.
- Use relevant keywords in your domain name: The inclusion of relevant keywords in your domain name makes it easier for visitors to understand and will help your blog’s ranking in search engine results.
- Don’t use hyphens or numbers in your domain name: You should avoid using hyphens or numbers in your domain name because they are susceptible to typos.
- Use TLD (Top-Level Domain) extension: Using a Top-Level Domain extension such as .com, .net, .org, .co, and .us will make your blog look more professional.
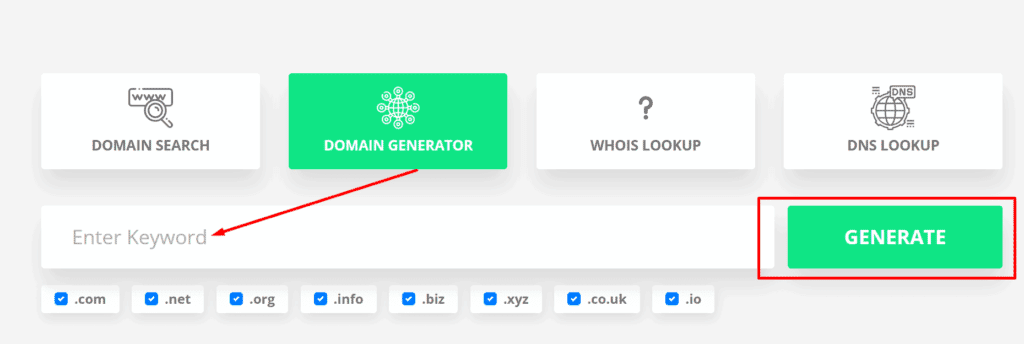
Not sure what domain name to choose? Click here to use a free domain name suggestion tool.
Step 4: Sign Up With a Blog Hosting Provider
A blog host is a place on the Internet where your website files are stored. For instance, this website won’t be available online without a blog host.
Here are a few things to consider when choosing a blog host:
- Speed: Nowadays, having a fast-loading website is very important, so you should always choose a blog host that guarantees fast server speeds.
- Uptime: Your website’s uptime refers to its availability online. Several blog hosts are usually affected by cyberattacks, which may result in server downtime. So, choose a blog host that guarantees at least 99% uptime.
- Customer Support: It is important to choose a blog host that offers 24/7 customer support through live chat or phone, so you can reach out to them faster whenever you encounter any problems.
Among all blog hosting providers on the internet, Bluehost stands out as the best and most reliable. They also have a great customer support team to assist with your questions and concerns.
When you sign up using the button below, Bluehost will give you a Free domain name and a 70% discount Off the normal price.

Click on the “Get Started Now” button to begin the sign-up process
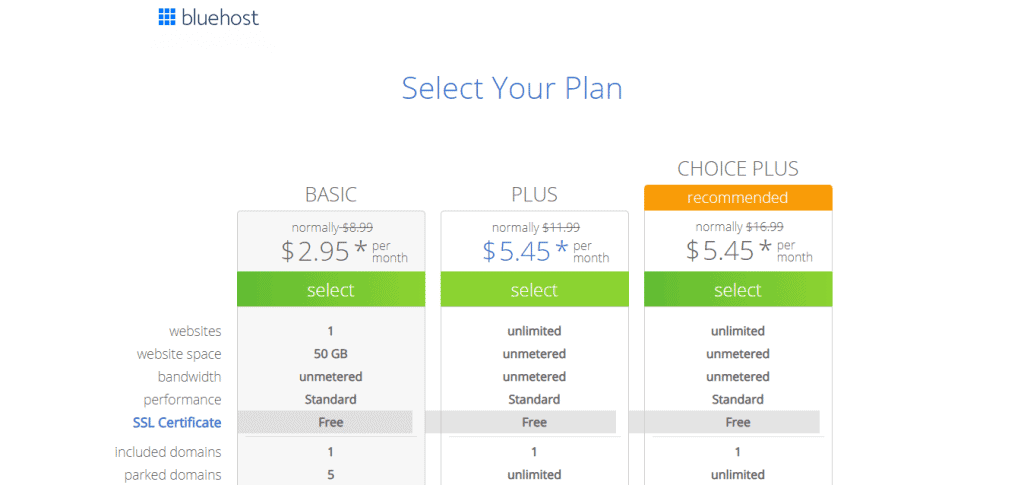
If you plan to build only one website, choose the Basic plan; otherwise, opt for the Plus or Choice Plus plan
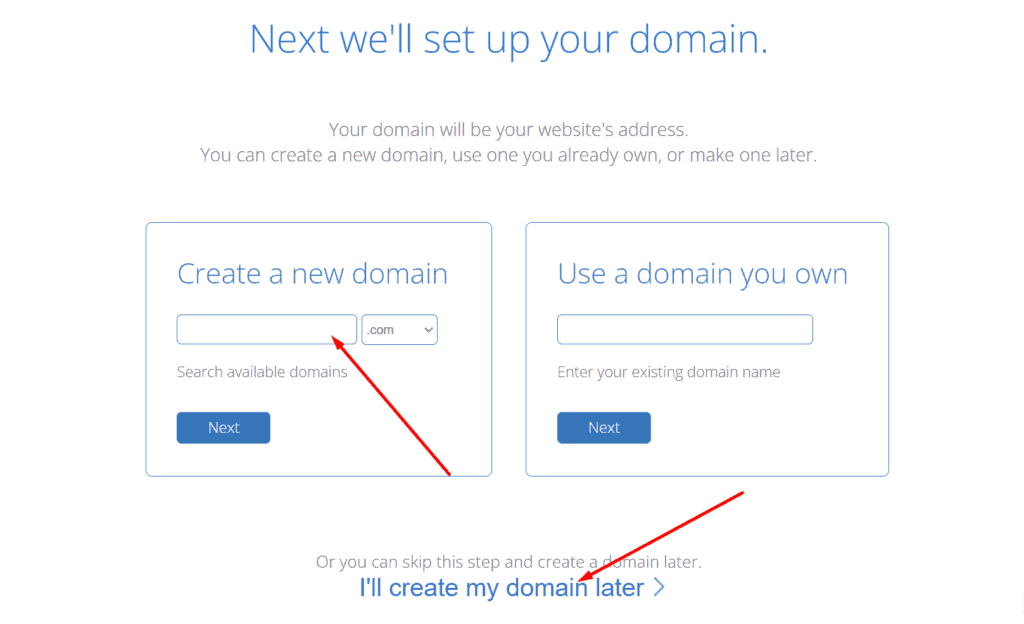
Upon selecting your blog hosting plan, you will be taken to a page where you can create a Free domain name for your blog. If you prefer, you can skip this step and create a domain name later.
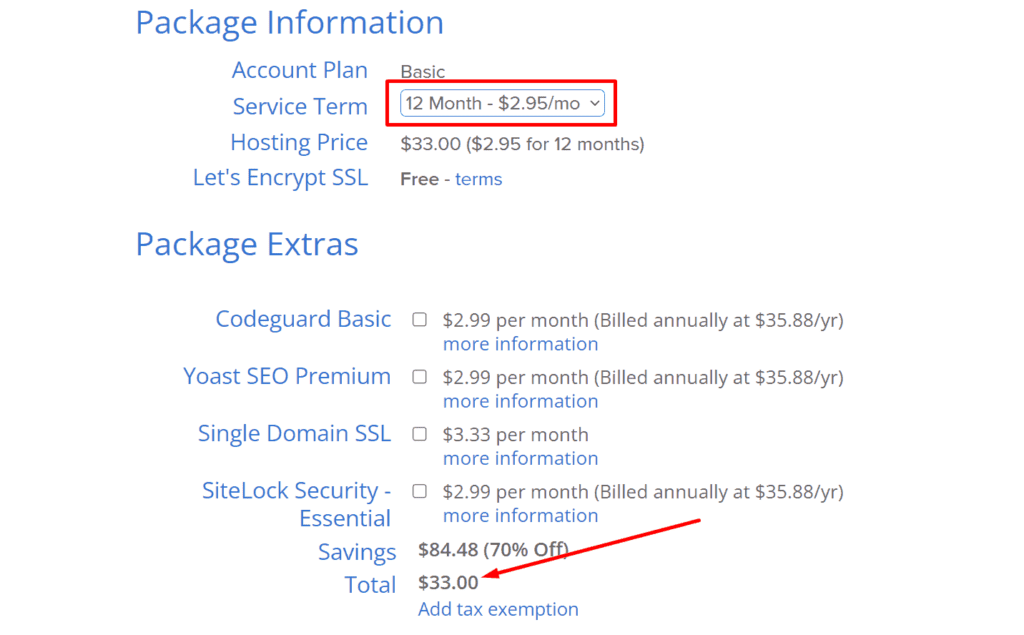
If you are on a tight budget, you might consider unchecking all package extras and pay only $33 for the first 12 months.
Step 5: Install a Blog Theme
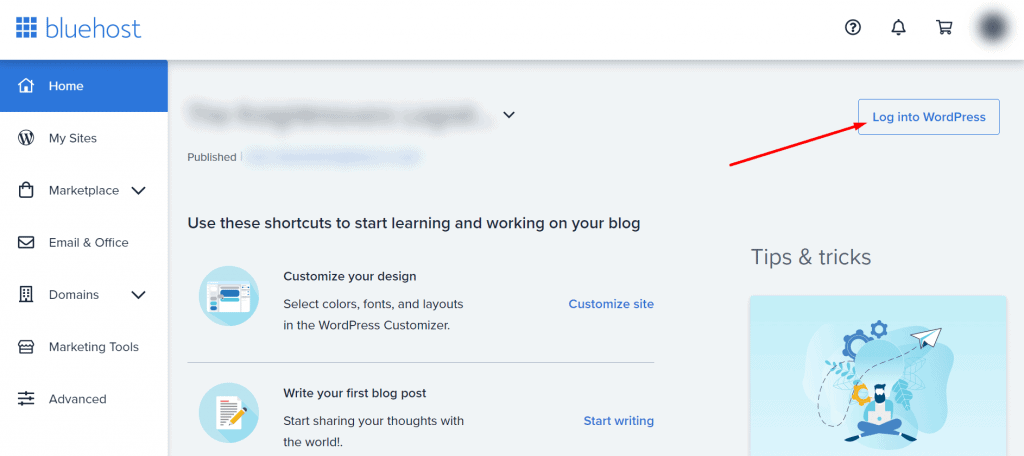
After completing the Bluehost sign-up process, you would be taken to your new Bluehost account dashboard which already has WordPress pre-installed, you can log in to your new WordPress website from your Bluehost account dashboard.
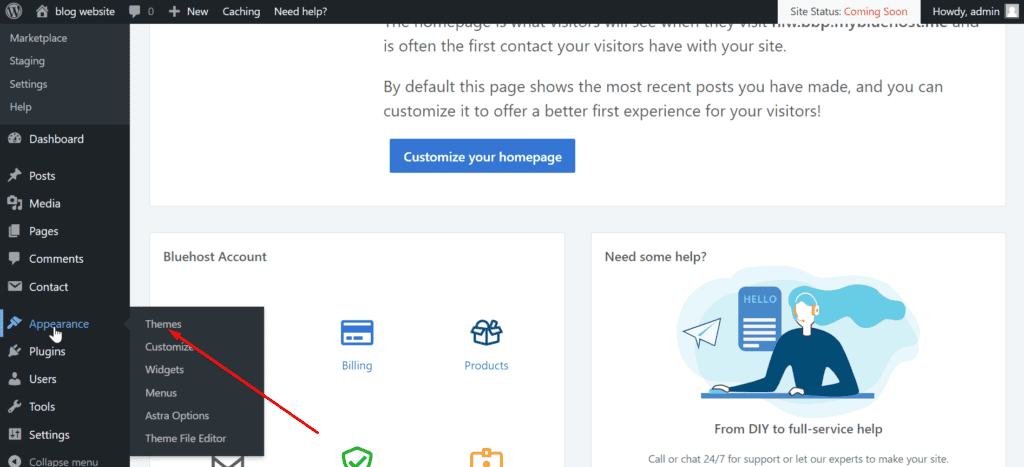
A theme allows you to customize and design the appearance of your blog. To install a theme, navigate to the left sidebar menu, hover your mouse over Appearance, and then click Themes. You will be taken to the theme directory page where you can select and install any theme of your choice.
I recommend that you install and create your blog with the Astra theme because it is easy to use and has many ready-made website templates that can be customized to create any kind of blog.
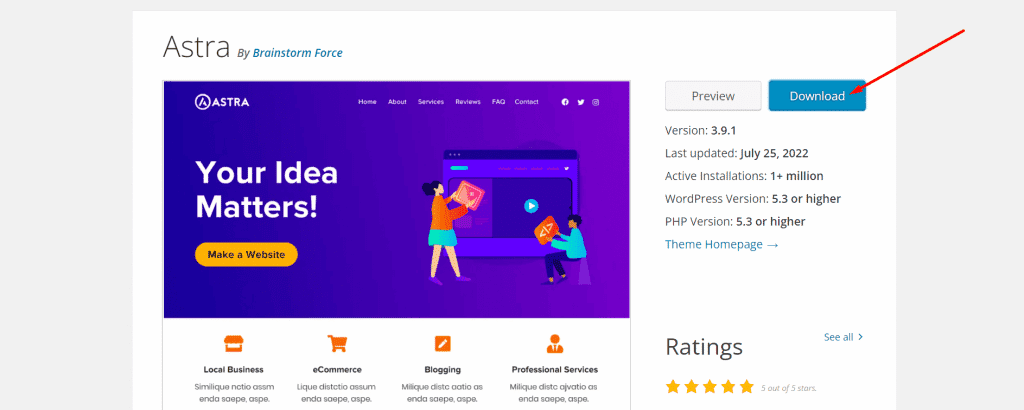
Click the Download button to get started with the Astra theme download.
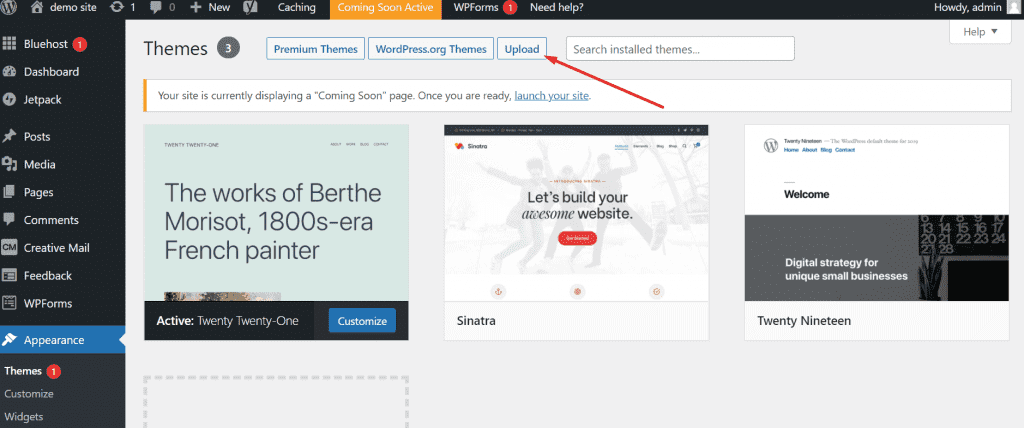
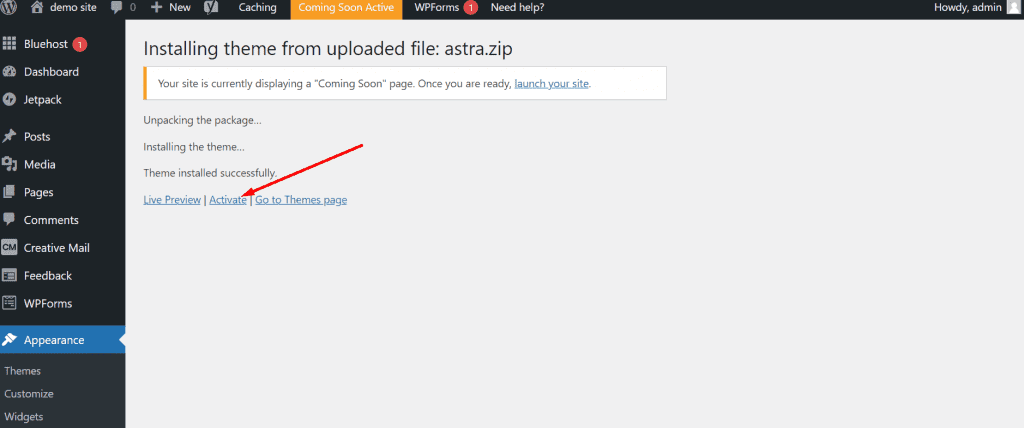
In order to install a theme, you must upload the downloaded theme file to your website. Click on the upload button to do so.
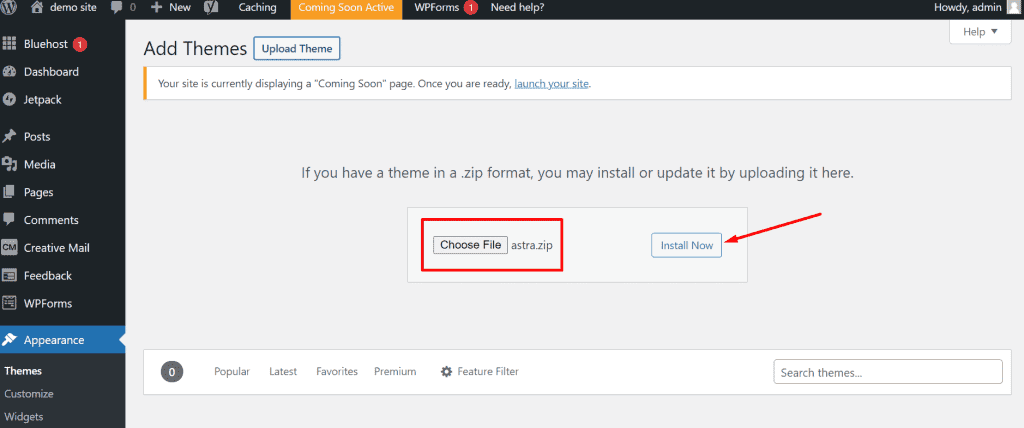
Select the theme file on your computer storage by clicking on the Choose File button, then click the Install Now button to install the theme on your website.
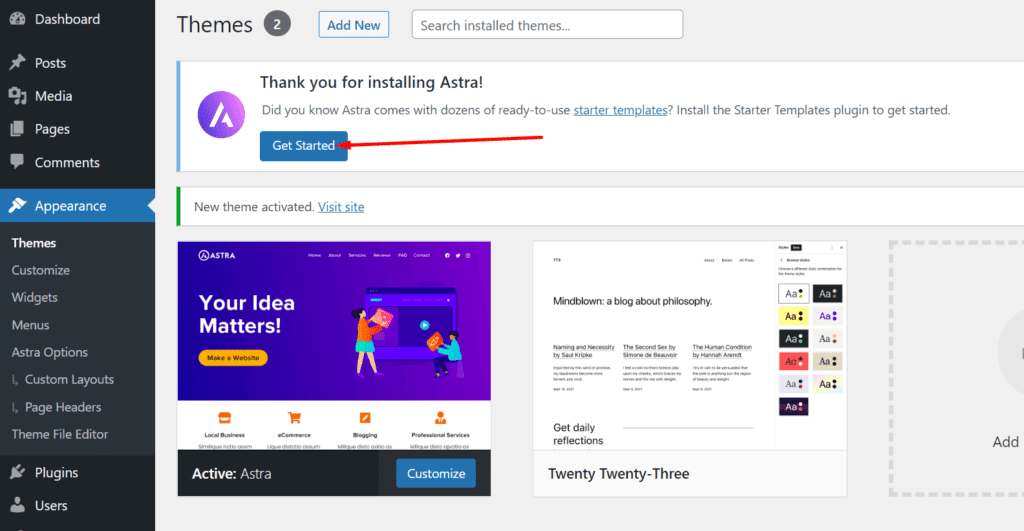
After the theme has been uploaded and installed, click on the Activate button to activate it.
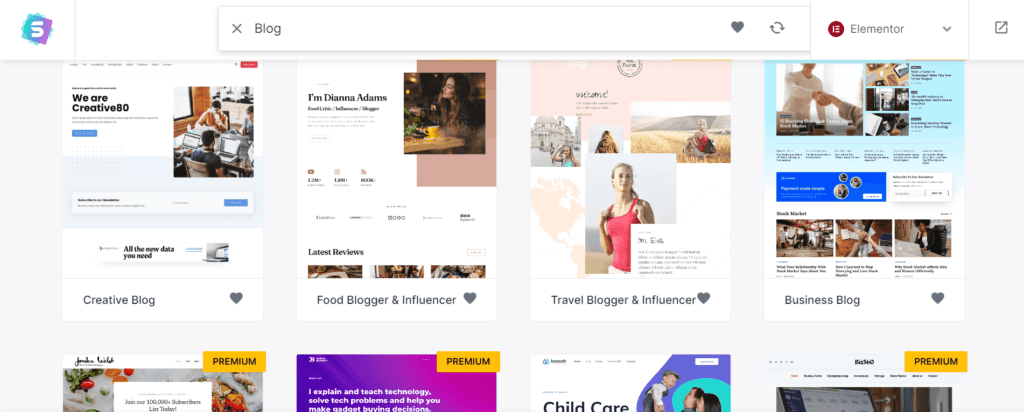
Once the Astra theme is installed and activated, you can choose from a variety of ready-made blog templates to begin designing your blog. Be sure to customize your selected template to suit your needs.
Step 6: Install Essential WordPress Plugins
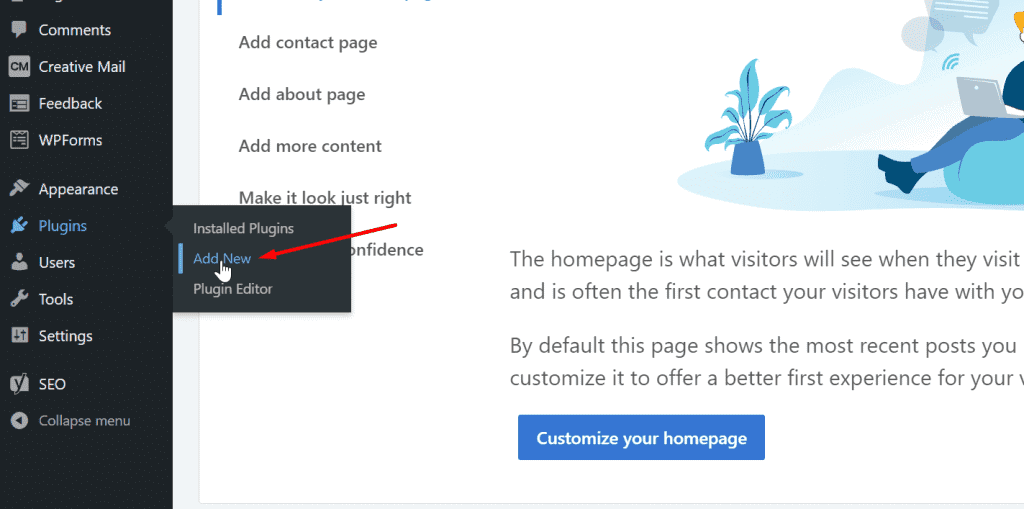
A plugin is a piece of software that adds more functionality to your WordPress blog. WordPress plugins make it easier for users to add more features to their websites without writing a single line of code.
Installing a WordPress plugin is really easy, navigate to the left sidebar menu and click on Plugins, then click Add New. You will be taken to the Plugin directory page where you can install any WordPress plugin.
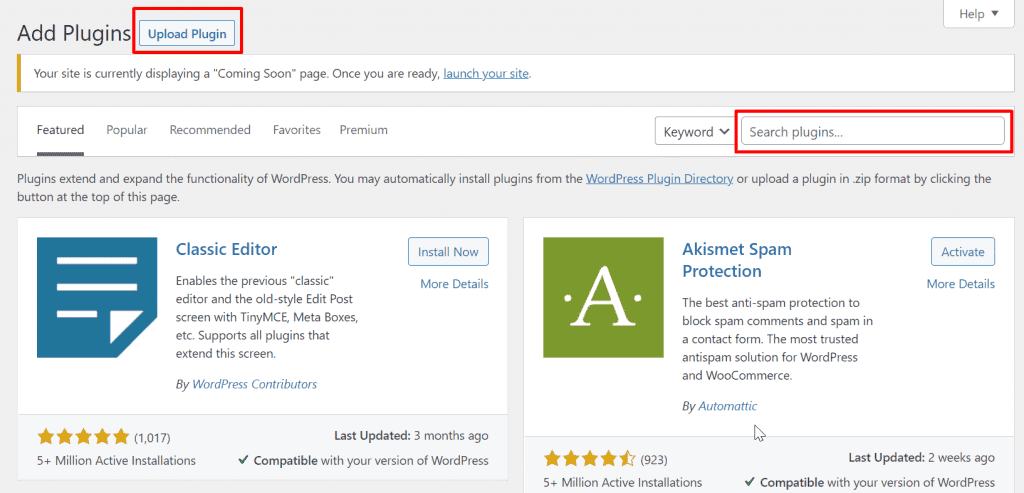
Below is a list of essential WordPress plugins and their uses:
- Elementor: Elementor is an easy-to-use drag-and-drop WordPress website builder, you can easily choose from a range of ready-made website templates and customize them to meet your needs.
- Smush: Large images and files size slow down website load time, so installing this plugin will help compress your website images without affecting their quality.
- Akismet Spam Protection: By activating this plugin, your blog’s contact form and comment form will be protected from spam submissions.
- Contact Form 7: The Contact form 7 Plugin allows you to create and add a contact form to your blog.
- WP Rocket: WP Rocket plugin allows you to significantly increase the speed at which your blog loads. Click here to download.
- Wordfence: Wordfence helps protect your blog from cyberattacks and malware.
Step 7: Create & Publish Your First Blog Post
To create a new post, click on the Posts menu in the left sidebar, then click on Add New. You will be taken to a new page where you can write your blog post and add images, categories, and tags.
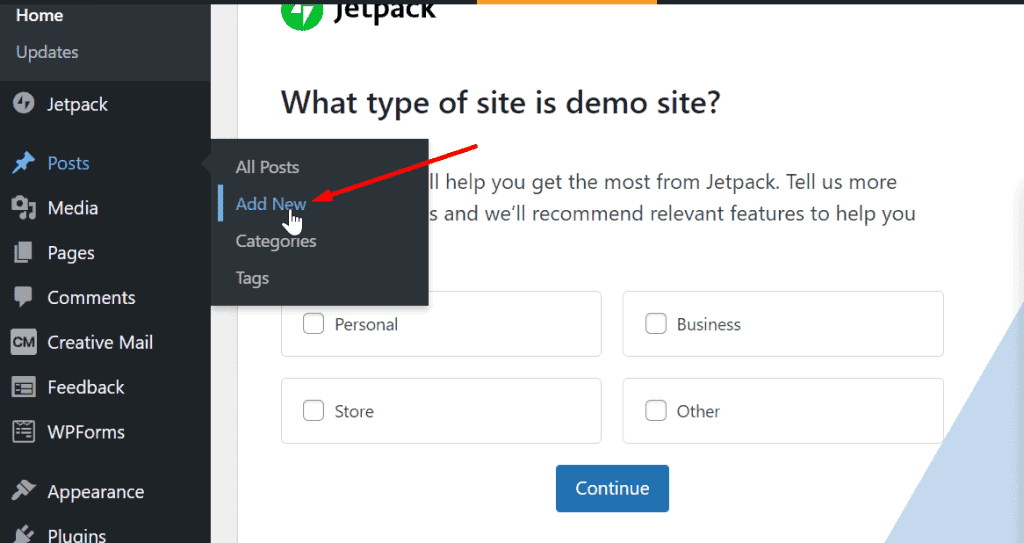
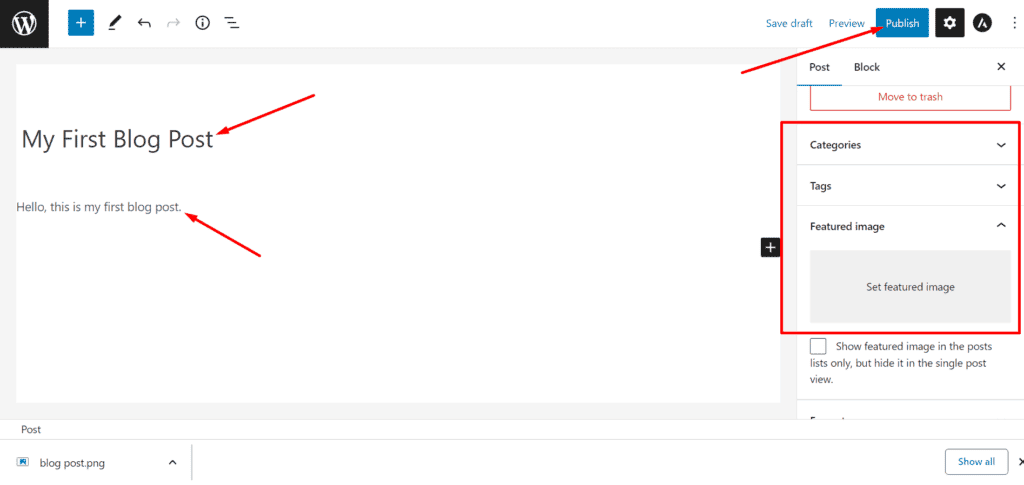
To save your blog post, click on the Publish button at the top-right menu after you have finished writing your post.
Step 8: Create Relevant Pages
Adding pages to your blog will help users better understand your blog and make it appear more professional. Make sure your blog includes relevant pages such as: About Page, Contact Page, Privacy Policy Page, and Terms & Conditions Page.
To add a new page, click on the Pages menu in the left sidebar then click Add New. You will then be taken to a new page where you can add the page title, text contents, and images.
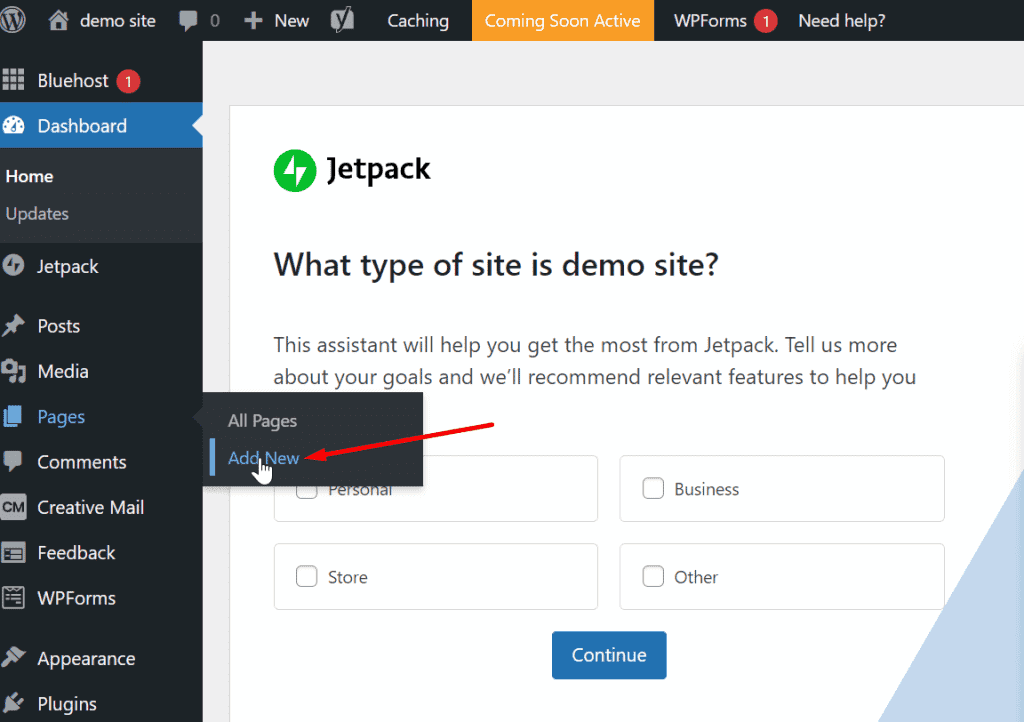
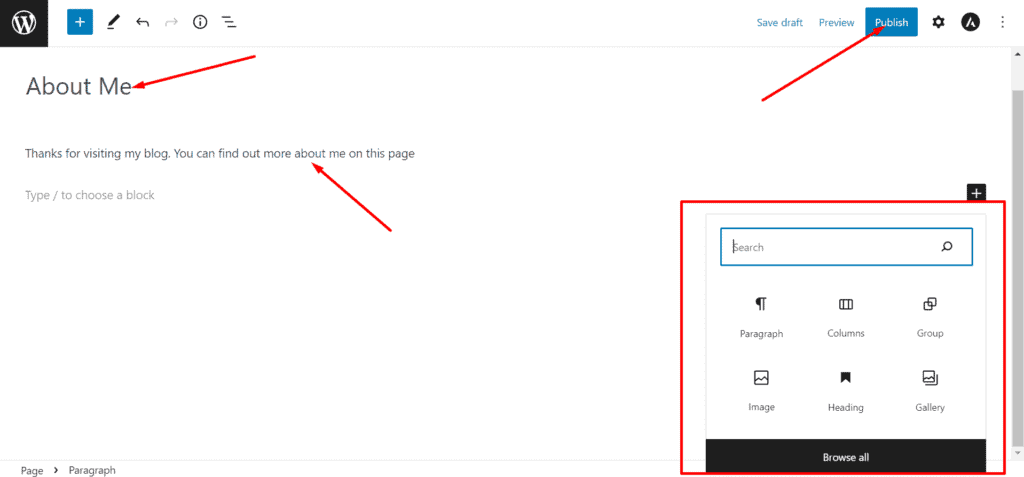
After you have added content to your new page, click the Publish button to save it
Tip: Instead of using the WordPress default page builder to create your web pages, consider using the Elementor page builder plugin, which is a widely used WordPress page builder for creating appealing and professional-looking pages.
Here is a video showing how to use Elementor to create a web page, click here
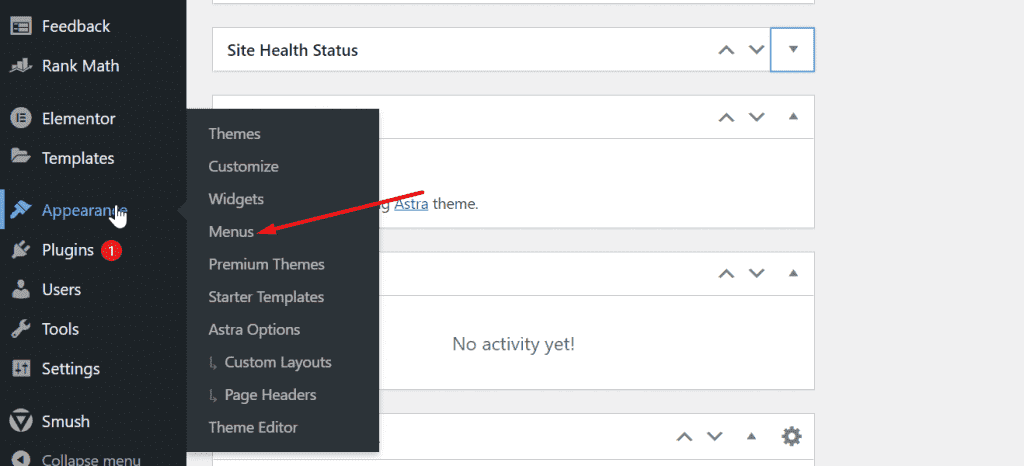
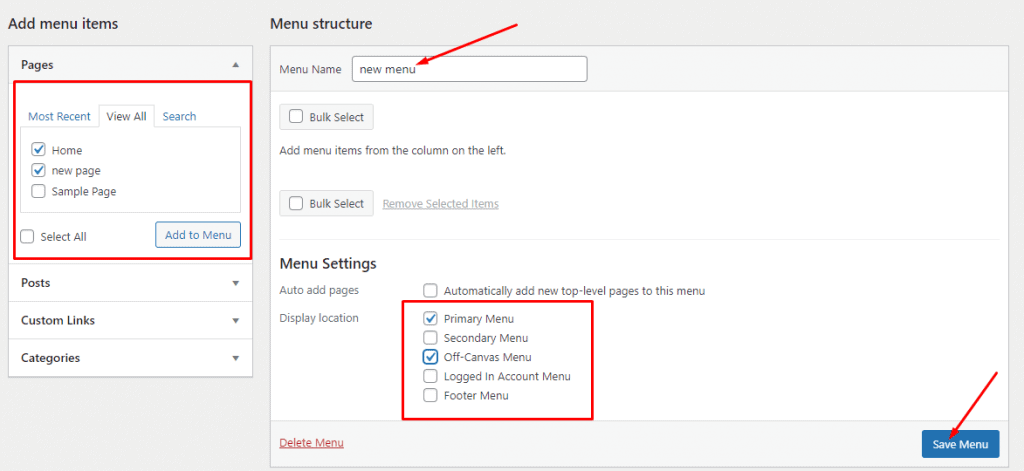
Step 9: Add a Navigation Menu
Having a navigation menu will make it easier for your visitors to access different pages on your blog. Follow the steps in the images below to create a navigation menu.
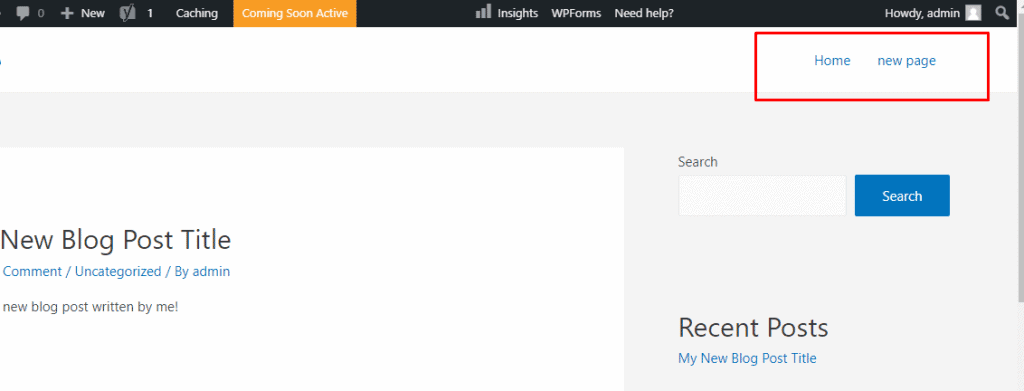
The new menu is now visible on your blog!
Read Also: How to Add a Logo to Your Website
Step 10: Launch Your Blog
This is the last step in the website-building process. Bluehost automatically puts your website in the coming soon mode once WordPress is installed. After your website has been set up, you will need to disable it.
Click the Coming Soon Active button at the top of the Website dashboard.
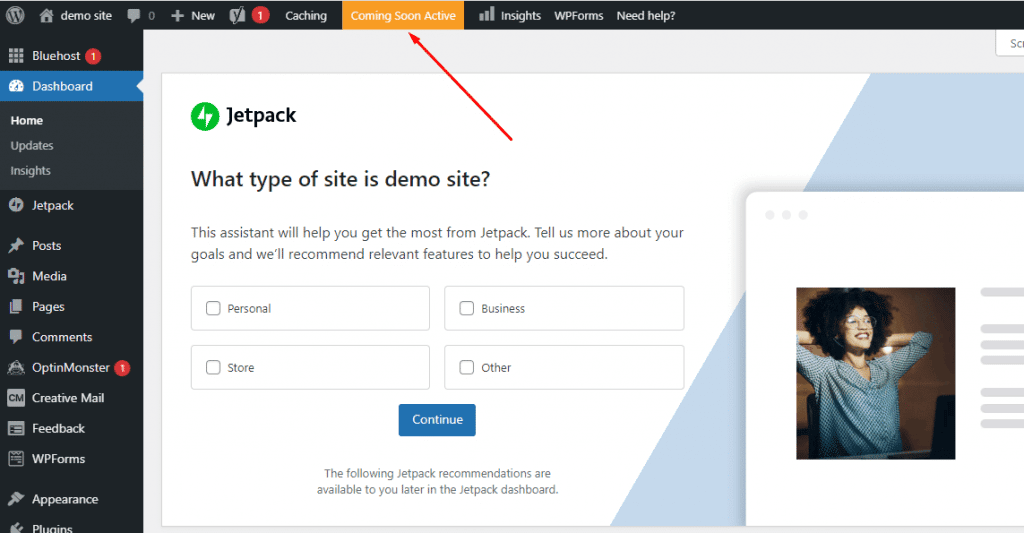
Then, click “Launch your site” at the bottom of the page.

Step 11: Promote Your Blog
Getting people to visit a new blog can be challenging, but with SEO ( Search Engine Optimization), you can rank your web pages for keywords with low competition and moderate monthly search volumes.
According to Wikipedia, Search Engine Optimization is the process of improving the quality and quantity of website traffic to a website or a web page from search engines (mostly from Google).
Approximately 5.6 billion searches are performed on Google every day, so ranking your web pages on the Google search engine would be the best way to attract visitors to your blog.
You can improve your website’s visibility in Google search engine results by installing the Rank Math SEO Plugin. To learn more about how to verify your website on the Google search engine using Rank Math, click here.
Other Ways to Promote Your Blog:
- Regularly Share Your Blog Posts on Social Media: Sharing your posts on social media regularly can help you get more traffic to your blog. When your posts go viral and receive a lot of engagement, your blog is more likely to get more traffic.
- Leverage the Power of Email Marketing: Approximately 80 percent of your website visitors won’t visit again after their first visit. By utilizing Email Marketing, you can easily create an email popup to collect the email addresses of your visitors and notify them whenever your new posts are published. With GetResponse, you can easily create an email list, email popups, and newsletter signup forms.
Step 12: Make Money From Your Blog 💰
After all the work you put into creating an awesome blog, it would be great if you could also make money from it.
Here are some ways you can earn money from your blog:
- Display Ads: Placing display ads on your website is a great way to monetize your blog. Google Adsense is one of the best display ad networks to use on your website, it accepts new blogs with low traffic, has a variety of ad formats, and also offers accurate tracking.
- Affiliate Marketing: With affiliate marketing, you can generate revenue for your blog simply by recommending tools, software, products, or services to your website visitors and adding your affiliate links to the recommendations. Whenever someone makes a purchase through your affiliate link, you get a commission. Click here to learn more about how affiliate marketing works.
- Sell Your Own Digital Products or Services: It could be an eBook, an e-course, a blueprint, or digital services such as Website design, Logo design, or Copywriting. With the Woocommerce plugin, you can easily sell your products and receive payments via PayPal, Stripe, or any other payment gateway.
- Sell Ad Space: You can partner with companies and brands to advertise their products or services on your website. It is more lucrative than Google ads, and you charge them a fixed rate or based on ad performance.
- Sell Sponsored Post: It could also be in the form of writing product reviews or “how-to” guides for a specific product, you would get paid upfront before publishing such articles on your blog.
Thank you for reading this post to the end. If you have any questions, please leave them in the comments section below, and I will respond as soon as possible. If you found this post useful, please share it!