Are you interested in creating an e-learning or learning management system (LMS) website like Udemy, Skillshare, or Coursera? Then this is the right post for you.
This post will provide a step-by-step guide to creating an LMS website. Here are the steps to follow to set up your eLearning or LMS website in no time:
⌚Are You Short on Time? Click Here to Create Your Website Right Away!
Don’t hesitate to contact me if you get stuck on any step in this guide, and I will assist you for Free!😉
1. Choose a Domain Name
A domain name is the address of your website on the internet (For example, google.com or amazon.com). Choosing the right domain name can boost your website’s ranking in search engine results, and it can help visitors understand what your website is about.
Here are some things to keep in mind when choosing a domain name for your website:
- Keep your domain name short and simple: A short and easy-to-pronounce domain name makes it easier for visitors to remember your website.
- Use relevant keywords in your domain name: The inclusion of relevant keywords in your domain name makes it easier for visitors to understand and will help your website’s ranking in search engine results.
- Don’t use hyphens or numbers in your domain name: You should avoid using hyphens or numbers in your domain name because they are susceptible to typos.
- Use TLD (Top-Level Domain) extension: Using a Top-Level Domain extension such as .com, .net, .org, .co, and .us will make your website look more professional.
Not sure what domain name to choose? Click here to use our domain name suggestion tool.
2. Sign Up With a Web Hosting Provider
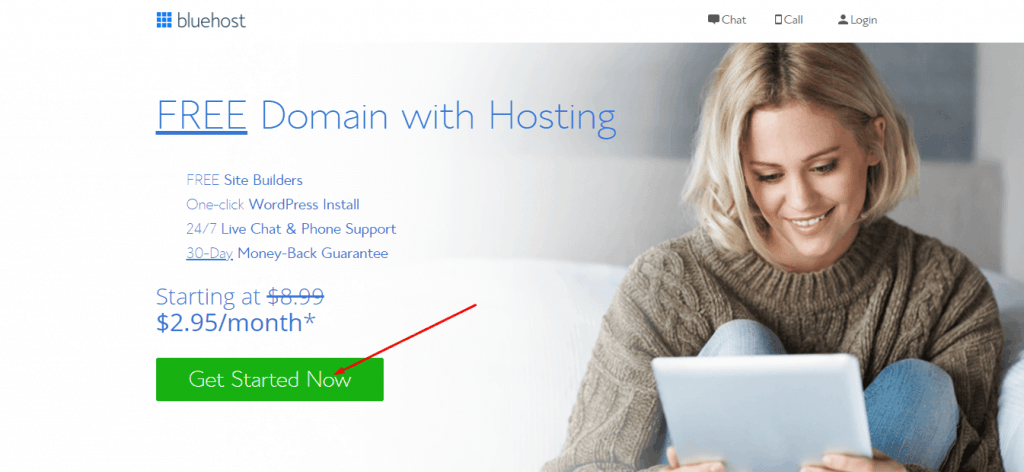
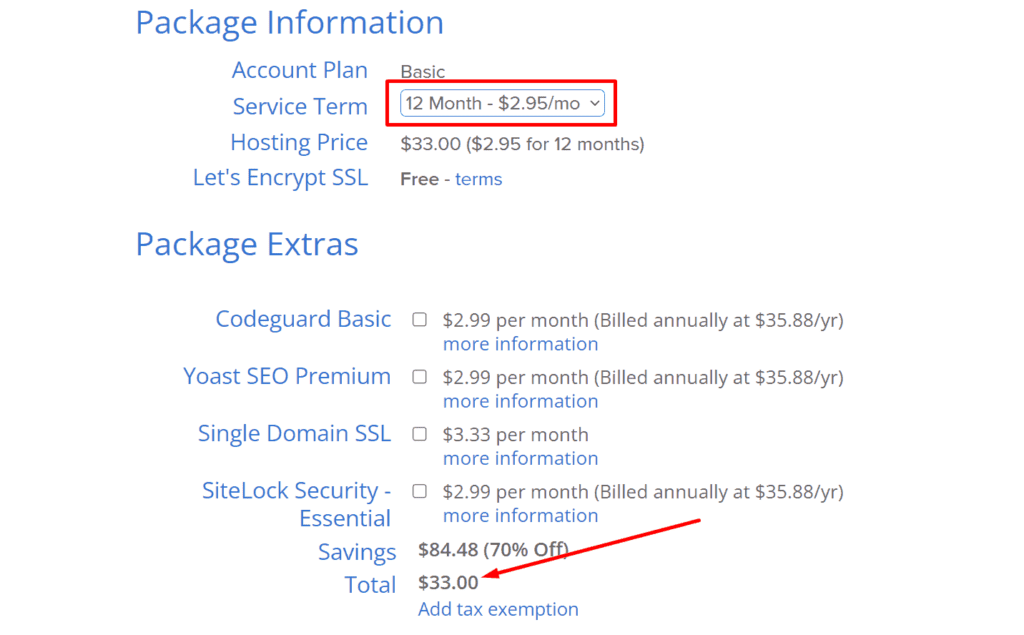
A web host is a service that stores and makes your website publicly available on the internet. Although there are hundreds of web hosting platforms available on the internet, I always recommend Bluehost for its speed, uptime, and responsive customer support.
Bluehost also offers up to 70% discount on its hosting plans, as well as a Free domain name. Click here to visit Bluehost and claim your discount.
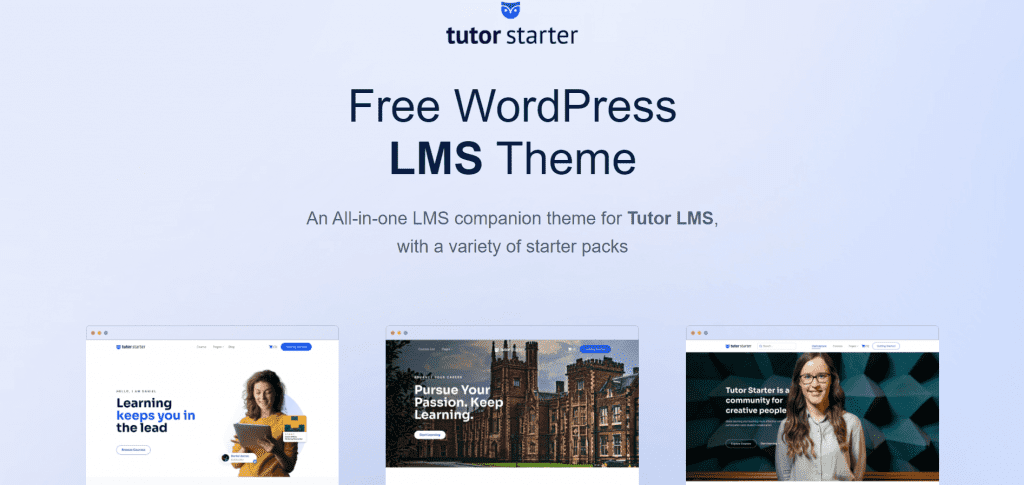
3. Install a Free LMS WordPress Theme
A theme allows you to design and customize the interface of your website. WordPress offers a variety of themes for building e-learning websites, but my preference would be the Tutor Starter theme for the following reasons:
- It offers a wide variety of demo templates that can be imported into your website and customized.
- It can be used with nearly every WordPress webpage builder.
- It is SEO optimized and has a fast loading speed.
The theme must be installed and activated on your website after it has been downloaded.
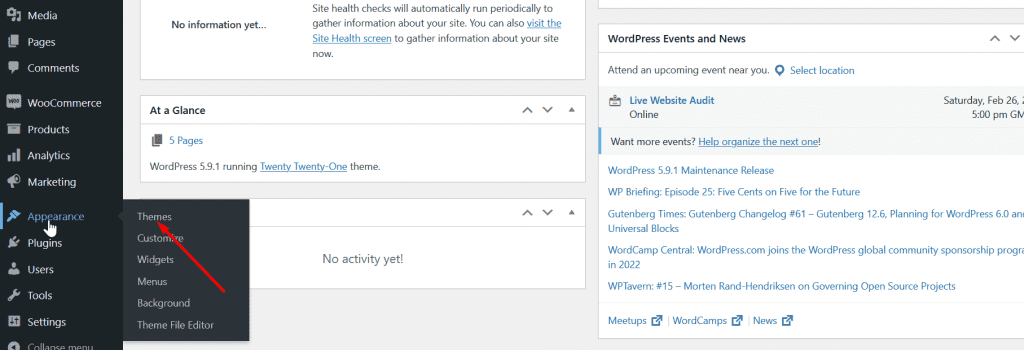
To upload the theme to your website, navigate to the left sidebar of your website admin dashboard, click Appearance, then Themes, and then click Add New.
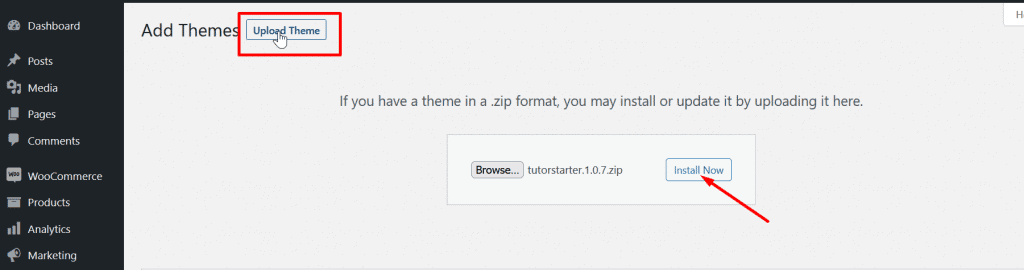
To install the theme, click on the Upload Theme button and choose the downloaded theme from your computer, then click on the Install Now button.
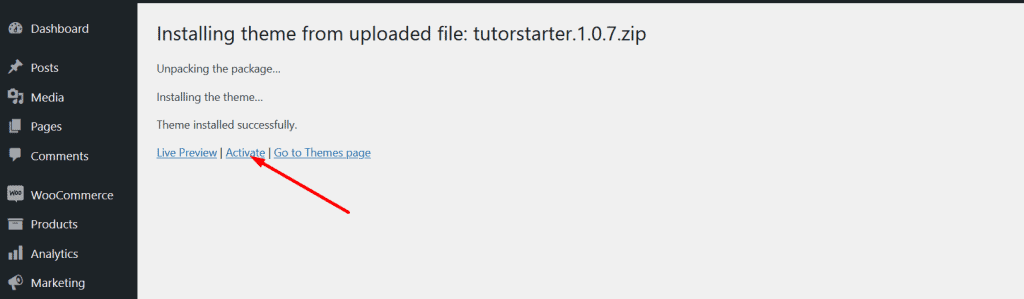
After installing the theme, click the Activate button to make it visible on your website.
4. Install WordPress Plugins
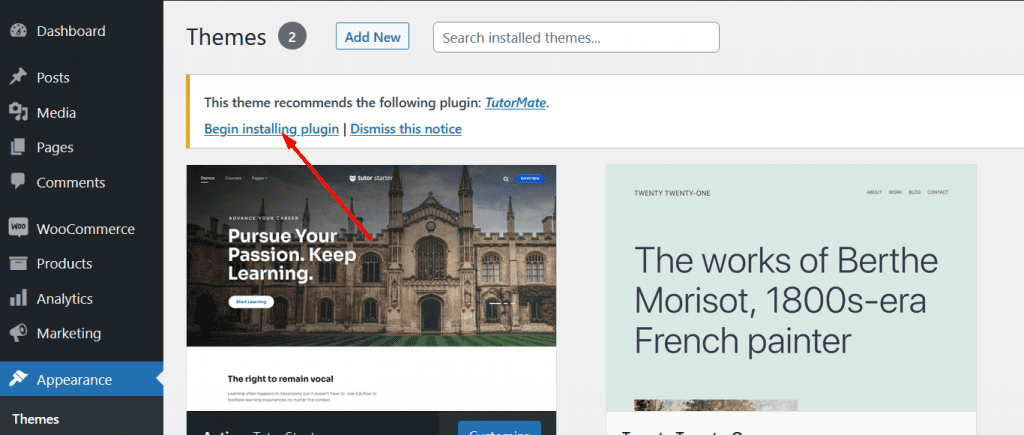
WordPress plugins are software tools that are used to enhance the functionality of WordPress websites. The Tutor starter theme requires the installation of the TutorMate plugin to import pre-made templates to your website.
Click on the Begin installing Plugin link to install and activate the plugin.
To improve your website’s functionality, you should also install the following plugins:
- Tutor LMS: It is essential to install this plugin since it handles eLearning features on your website such as creating courses, quizzes, certificates, and much more. Click here to download the Tutor LMS plugin for free.
- Elementor: Elementor is an easy-to-use WordPress website builder. With it, you can simply drag and drop elements to build a great-looking website. Click here to download Elementor
- Smush: Using this plugin, you can easily compress large images and files on your website and greatly improve the loading time of your website.
- Contact Form 7: With the Contact Form 7 WordPress plugin, you can create a contact form on your website and receive submissions in your mailbox
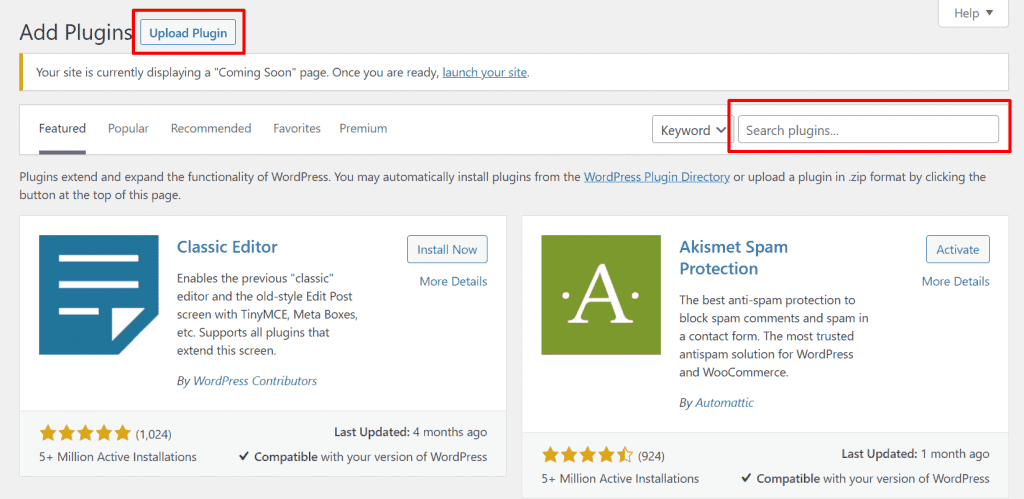
To install a plugin on your website, navigate to the left sidebar of your website admin dashboard and click on Plugins, then click Add New
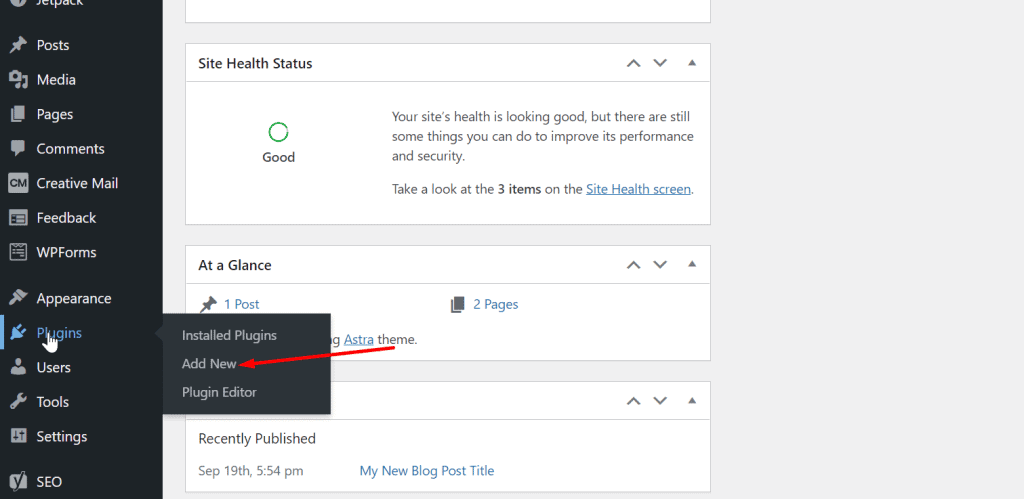
A new page will appear, where you can install the plugin from the WordPress plugin directory or upload it from your computer
5. Import a Demo Template
The Tutor Starter Theme comes with a variety of demo templates that you can import to your website and customize, although this isn’t necessary if you prefer to build your website from scratch; however, using a demo template will make the process of setting up your website faster.
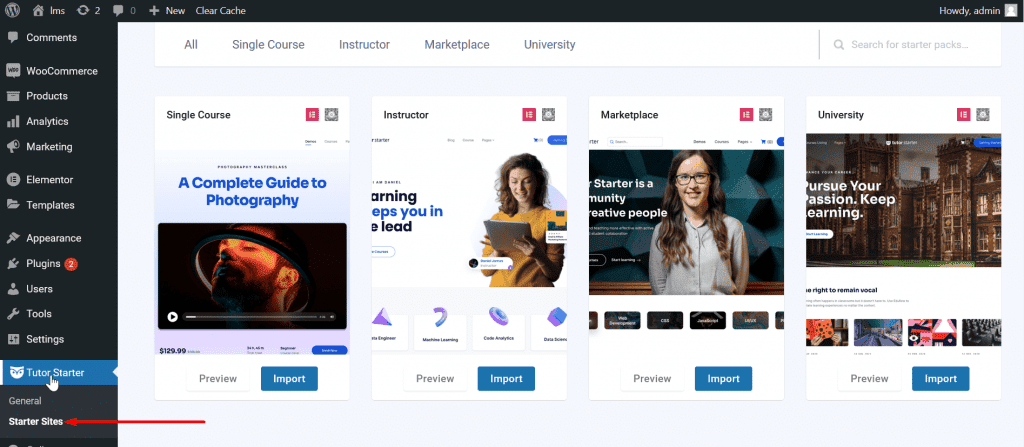
To install a demo theme, navigate to the left sidebar dashboard of your admin dashboard, click Tutor Starter, then click Starter Sites. You will be taken to a new page where you can preview the demo templates and install the one you prefer.
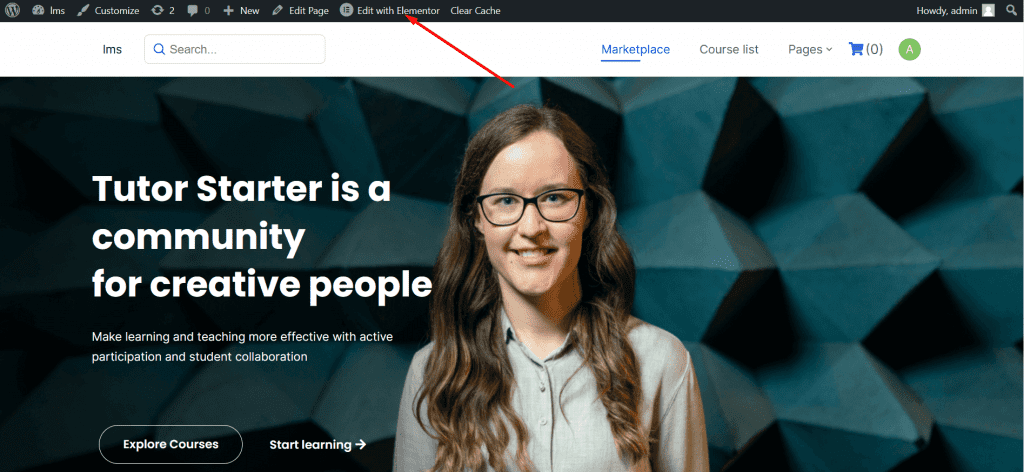
Once you have installed your preferred demo template, you can edit and customize it with the Elementor website builder by clicking the Edit with Elementor link on top of your website. To see a video on how to edit your website with Elementor, click here.
6. Create Relevant Web Pages
Having pages on your website helps users understand and navigate your website. There is no limit to the number of pages that should be included on your website, but some pages are absolutely vital.
Here are some pages that you should consider adding to your LMS website:
Homepage:

This is the first page that your users see when they visit your website, so make sure it contains relevant information and courses.
Course Page:
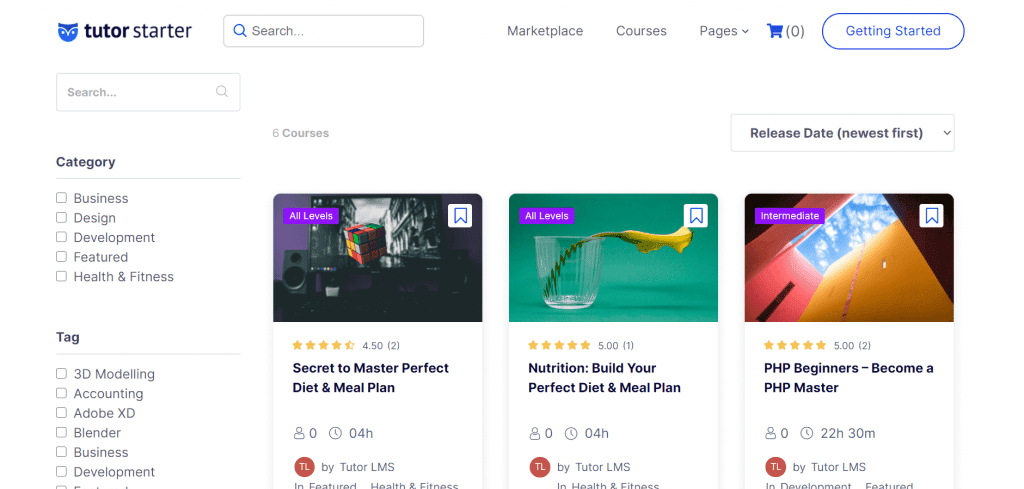
This page should feature all the courses available on your website as well as a call to action button, such as ‘Buy Now‘ or ‘Enrol Now‘.
Contact Page:
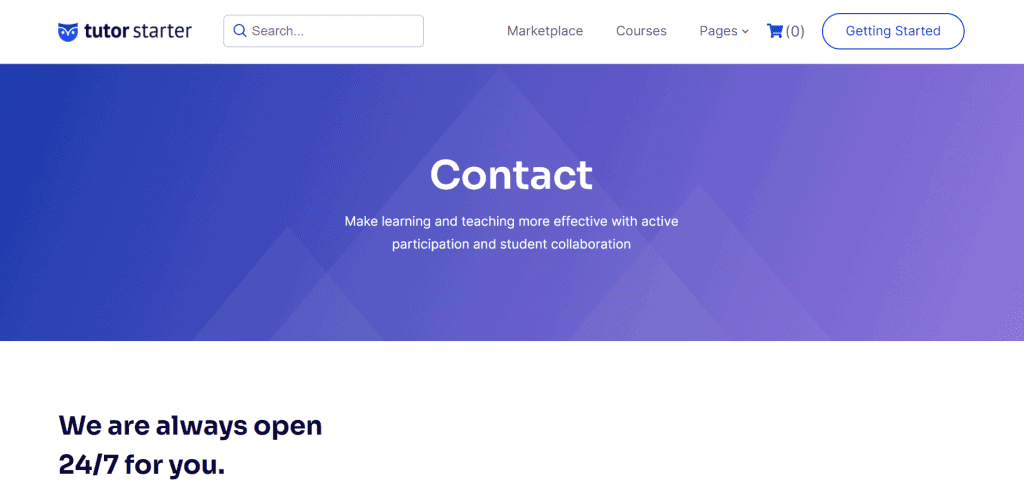
This page should include your relevant contact information, such as your e-mail address, phone number, and office address. You can also include a contact form on this page using the Contact Form 7 plugin.
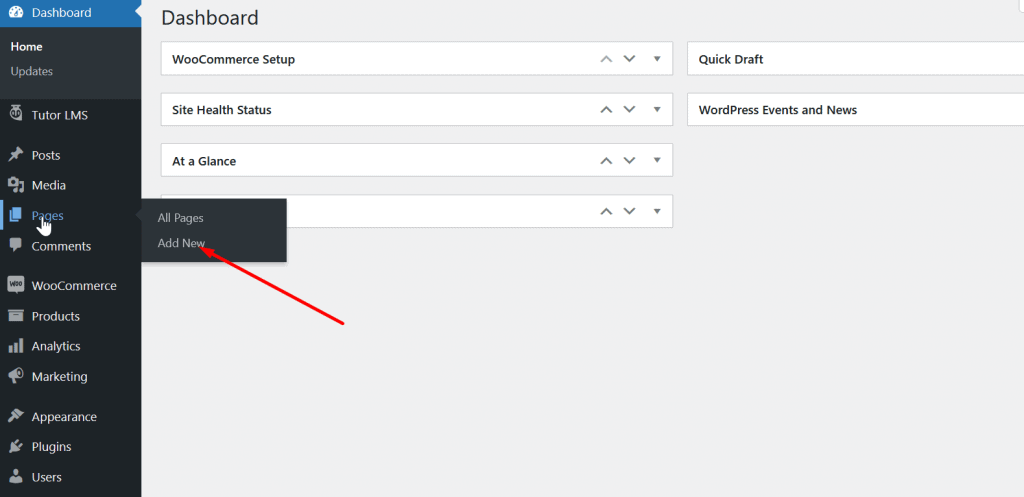
To create a new page on your website, find the Pages menu on the left sidebar of your admin dashboard, then click on Add New.
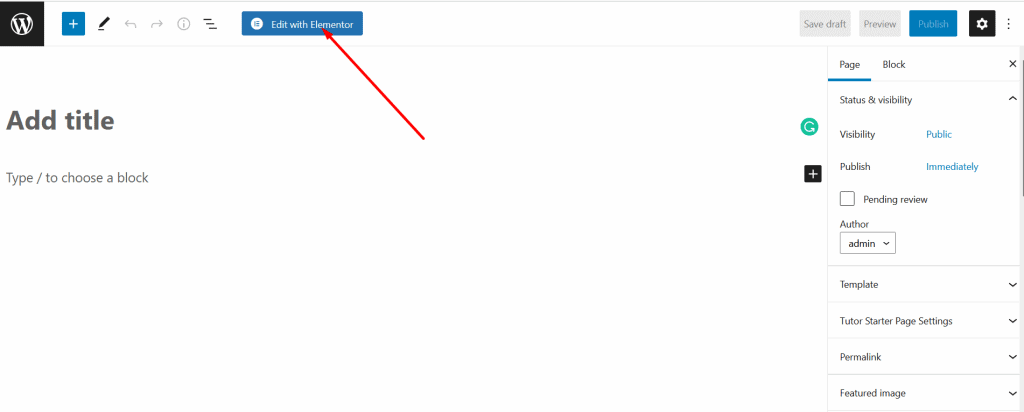
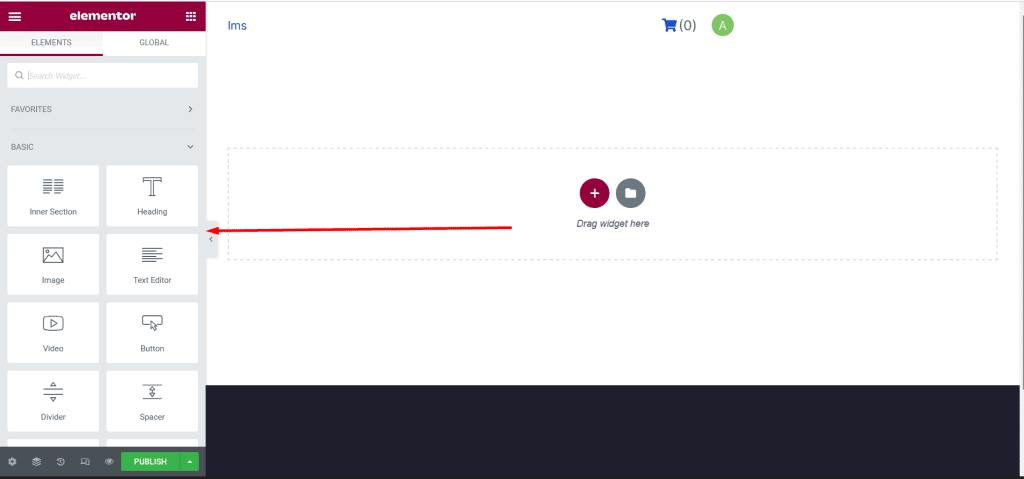
On the new page, click Edit with Elementor button and you will be taken to a new page where you can then drag and drop elements to create your page with the Elementor website builder.
You can then create a new page by dragging and dropping elements from the left sidebar onto your page. To see a video showing how it’s done, click here.
7. Create a Navigation Menu
A navigation menu allows users to navigate to different pages of a website easily. It usually appears at the top of the website, and it contains links to relevant pages.

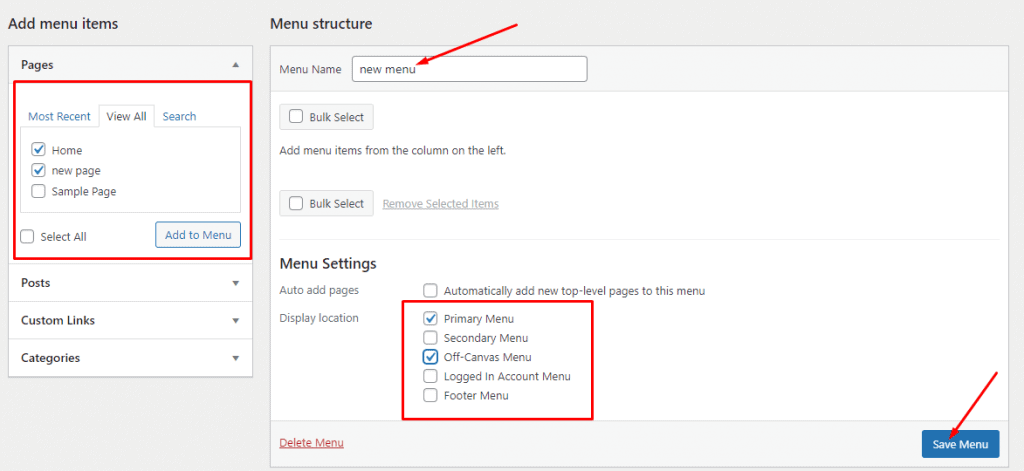
To create a navigation menu for your website, click on Appearance and then Menus on the sidebar of your admin dashboard.
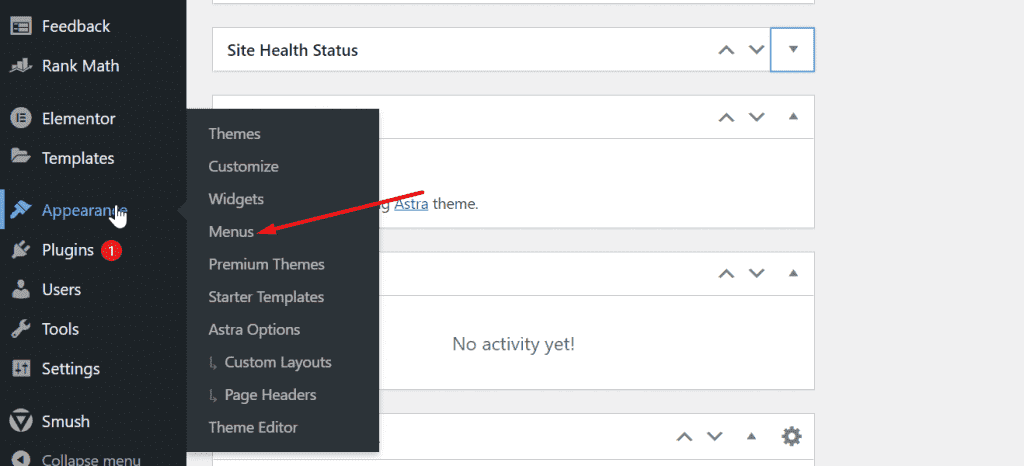
A new page will appear where you can create your website navigation menu and include links to pages that should appear in the menu.
Read Also: How to Add a Logo to Your Website
8. Create and Add Courses to Your Website
Following the basic website setup, you will need to add courses and enable the eLearning features using the Tutor LMS plugin.
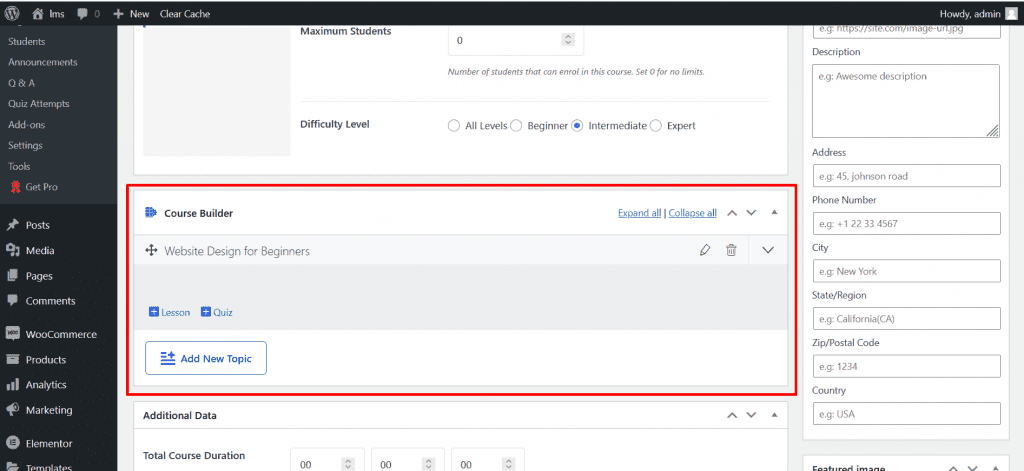
To add courses to your website, navigate to the left-hand sidebar menu of your website dashboard, select Tutor LMS, and then click on Course.
A new page will appear where you can add the course title, description, requirements, course materials, and videos.
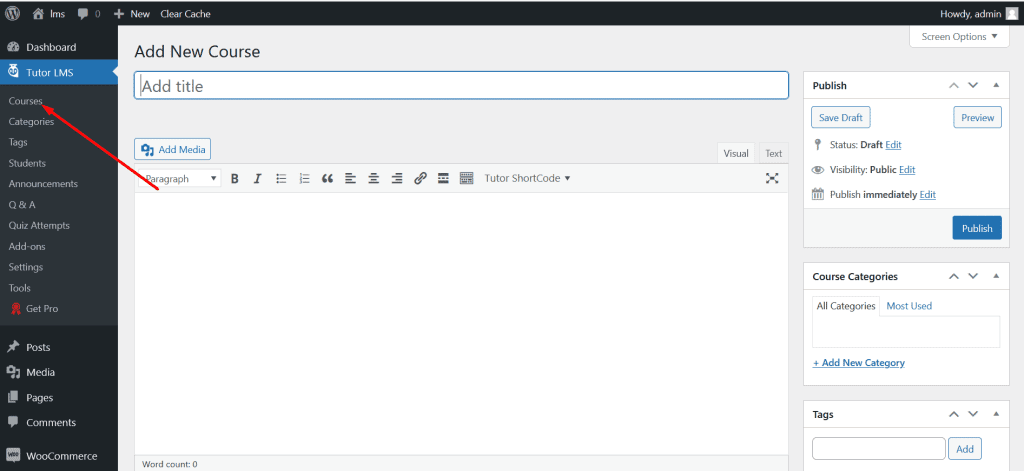
Additionally, you can add course topics, lessons, videos, and quizzes to this page
It is pretty much possible to create your eLearning website with the free version of the Tutor LMS plugin, but the premium version adds more features and enhances your website.
9. Set Up a Payment Method
In order to make courses available for sale on your website, you will need to set up a payment method, you can use the WooCommerce WordPress plugin to add prices to courses and make them purchasable.
Here’s a video that can help you understand the technical aspects of the setup process. Click here to watch.
10. Enhance Your Website Design and Functionality
Enhancing your website’s design and functionality would make your website appear more appealing and professional. However, the steps might seem confusing at first, so watch this video for a more detailed explanation, click here.
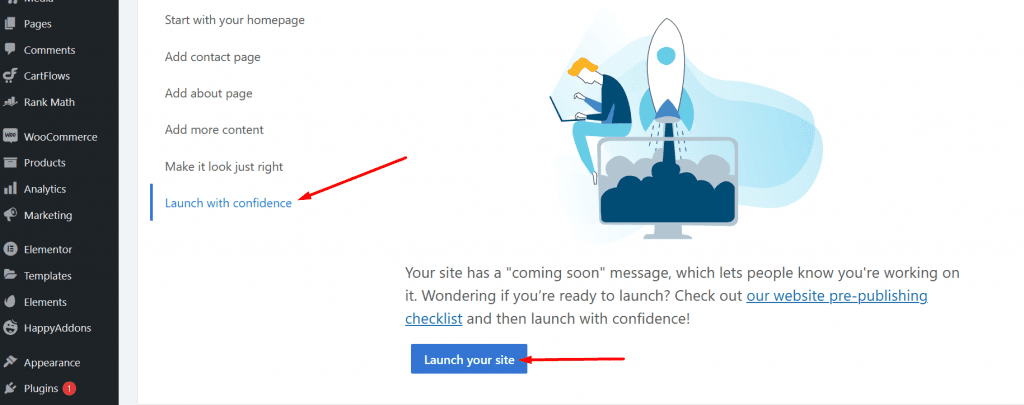
11. Make Your Website Public
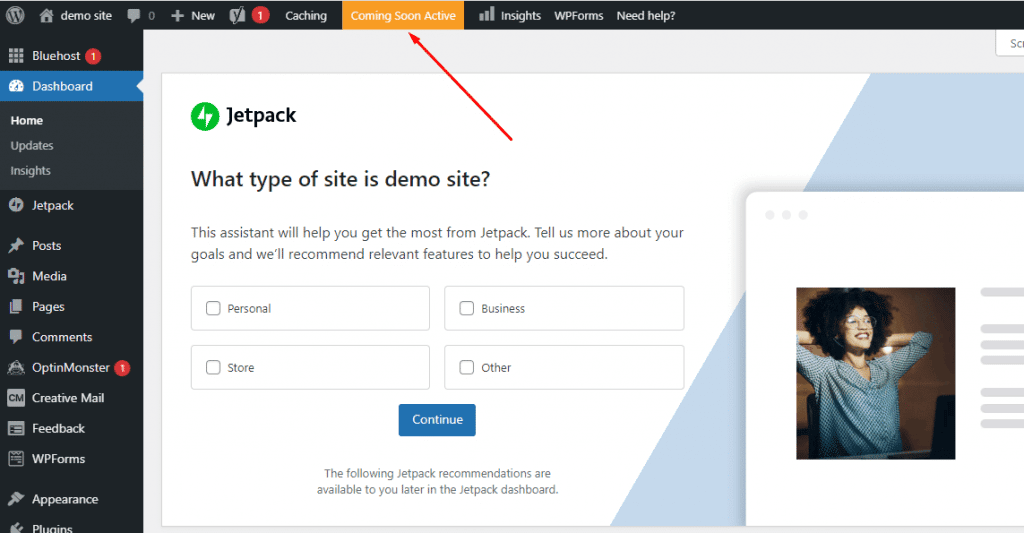
It is necessary to make your website public once you have completed the setup. Bluehost automatically places your site in coming soon mode after registration, so you will need to disable this to make your website public.
To disable the coming soon feature, navigate to the top menu of your website dashboard and click the Coming Soon Active link. You will then be taken to a page where you can disable this feature and make your website public.
12. Drive Traffic to Your Website
Driving traffic or web visitors to your website is important for increasing your revenue. Here are a few ways to increase traffic to your website:
- SEO: Search Engine Optimization (SEO) is the process of ranking your web pages for specific keywords on search engines so that your website shows up every time someone searches for that keyword. Click here to learn more about optimizing your website for search engines.
- Post content regularly on your website’s social media pages: When you publish content regularly on your website’s social media pages, you can attract more visitors to your website, especially when your content goes viral and gets a lot of engagement.
- Promote your site with ads: This is the fastest way to bring visitors to your website. With platforms like Google AdWords and Facebook ads, your website can reach a wide audience quickly and efficiently.
13. Tip: How to Secure Your Website
With over 30,000 websites getting hacked daily, it is essential to secure your website from vulnerabilities. Here are a few tips on how you can secure your website:
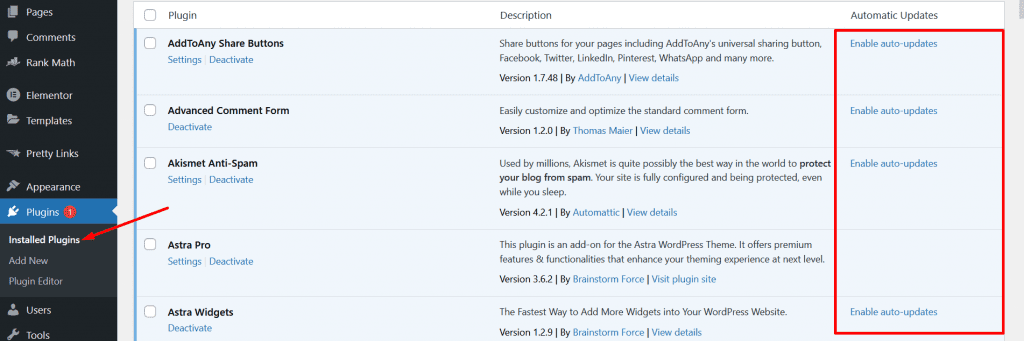
Keep your website theme and plugins updated: It is important to keep your WordPress theme and plugins updated to ensure the security of your website because outdated themes and plugins can lead to vulnerabilities.
You can set your plugins to Automatic Update so each time a new version is released, they will automatically update. This will save you from having to go to your website dashboard and update every time a new version is released.
Install the Wordfence plugin: Wordfence is a security plugin for WordPress which provides a firewall and prevents hackers from looking for hidden vulnerabilities on your site.
It also scans your website for malware and alerts you about suspicious logins. Click here to download the Wordfence plugin.
Thank you for reading this post to the end. If you have any questions, please leave them in the comments section below, and I will respond as soon as possible. If you found this post useful, please share it!